


Sailor's rope bracelet - tying and adjusting made easy
You have the bracelet in your hand and want to put it on quickly, but then exactly what almost always happens when the knot has not been made properly happens. Either it barely fits over your hand, later slides up to the back of your hand, or you pull it so tight that it can no longer be adjusted properly.
With rope bracelets, the knot is not just decoration. It determines fit, ease of use, and durability. That is where things get interesting in practice. Many people show only some attractive finishing knot, but everyday use demands something else. The bracelet must be easy to adjust, move smoothly, and still sit securely.
Table of contents
- Why the right knot determines everything for a rope bracelet
- Materials and preparation for your sailing-cord knot
- The most important sailing rope bracelet knots explained step by step
- Opening a sliding knot and adjusting the bracelet correctly
- Avoiding wear, care issues, and common mistakes
- Your perfectly fitting nautical rope bracelet for every day
Why the right knot determines everything for a rope bracelet
A rope bracelet looks simple. But there is more to its construction than meets the eye. The knot performs several tasks at once. It holds the band together, determines how far the bracelet can open, and affects whether the piece sits neatly on the wrist or keeps tipping over.
If you simply use any thick jewelry knot, you often end up with a bracelet that looks good on the table but is annoying to wear. Too stiff. Too bulky. Or only possible to open with a lot of fiddling. With a good rope bracelet knot, things work differently. The knot should grip in a controlled way, not lock up.
Decorative does not automatically mean practical
I see the same mistake with rope bracelets every time. Many people look for the most beautiful knot first. The better question is the reverse. How should the bracelet work in everyday life?
- For putting it on and taking it off every day, a sliding knot is better suited than a rigid finish.
- For a clear shape and stopping point, a figure-eight knot is effective because it reliably acts as a stopper.
- For a calm overall look, small securing knots at the ends help prevent fraying or pulling out of shape.
Knots in jewelry need to be approached differently from knots on board. The issue is not maximum load, but controlled movement, smooth guidance, and comfortable wear.
The maritime origins are nevertheless about more than just appearance. The term sailor's knot is closely associated with the era of the “Great Sailing Ships,” roughly 1800 to 1900, and during this period the practical seafaring knots commonly used today were systematically developed and standardized, as the history of knots at Jack Tar explains. That is precisely why good knots on a bracelet do not seem arbitrary, but technically coherent.
What really matters in everyday life
In jewelry, the wheat is usually separated from the chaff in three areas:
- The bracelet must fit over your hand without you having to struggle every time.
- It must not slide around on the wrist once you tighten it.
- The knots must be positioned symmetrically, otherwise even good material looks cheap.
Once you have solved this properly, you notice the difference immediately. The bracelet is not only more comfortable to wear. It also looks more premium.
Materials and preparation for your sailing-cord knot
This happens constantly in practice: The cord looks good, the knot is familiar, and yet the bracelet ends up sitting crooked, rubbing against the wrist, or only going over the hand with difficulty. The mistake is almost always in the preparation. The length, material thickness, and clasp must work together. Otherwise, even neat knotting will not help much.
For an adjustable sailing-cord bracelet, a German-language DIY guide recommends around 80 cm of sailing cord and a distance of approx. 12 cm between two knots, as described in the tutorial for the adjustable jewelry knot with sailing cord. For models with 2-mm cord, people often use 80 to 90 cm of cord, an anchor clasp in the middle, and a loop at the opposite end, as Glücksfieber shows for accessories for 2-mm sailing cord.
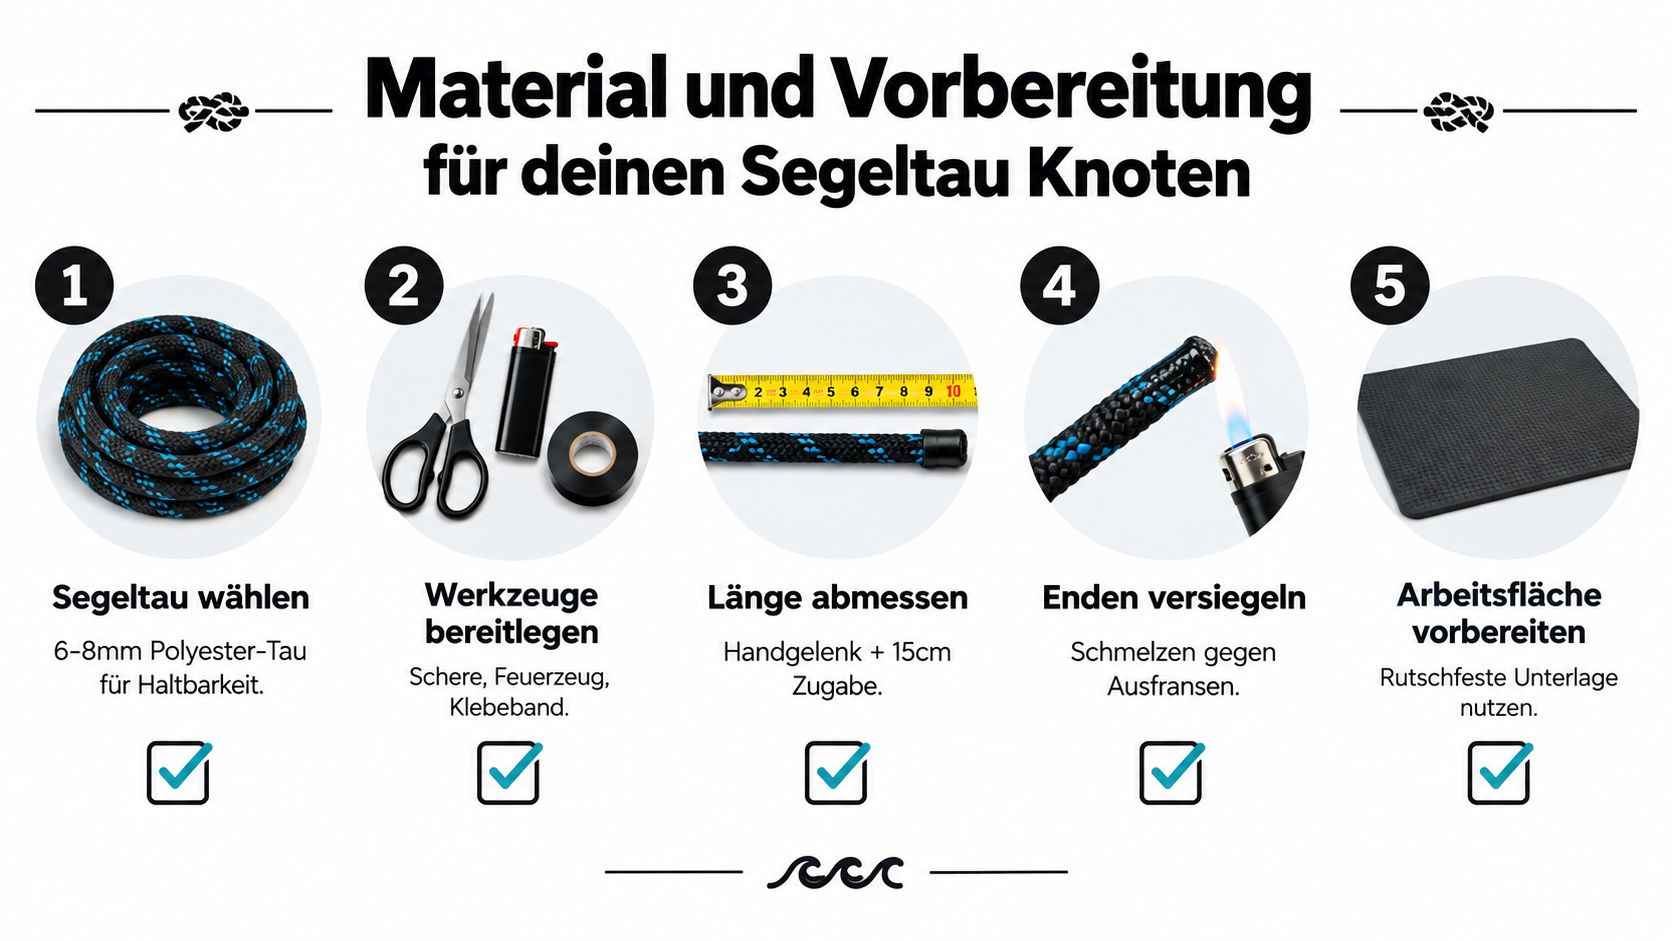
What belongs on the table
Before making the first cut, I always lay everything out. This prevents mistakes, especially with adjustable bracelets, where one millimeter at the knot can later determine whether the fit is good or you have to keep tightening it.
- Sailing cord in the appropriate thickness. 2 mm looks finer and works well for narrow wrists. 4 mm is often more comfortable for everyday wear and retains its shape better.
- Sharp scissors or cutting tool. A clean cut makes threading the cord through tight knots much easier.
- Adhesive tape. Wrap it tightly around the cord before cutting so the sheath does not unravel.
- Lighter. For briefly melting the ends. Only enough to seal the fiber.
- Adhesive if needed. Useful for end caps, magnetic clasps, or when one end is secured in the metal component.
- Tape measure or ruler. Without measuring, a good design can quickly become a bracelet that is comfortable in only one position.
Choosing materials based on your wrist and everyday use
Here, people often focus only on appearance. But for a bracelet worn every day, the combination of cord, knots, and clasp matters.
A sliding knot needs material that glides smoothly while still providing friction. Rope that is too soft pulls nicely but loosens more quickly in everyday use. Rope that is too stiff holds its shape, but is often harder to adjust tightly enough on smaller wrists. For larger wrists or when the bracelet is frequently put on and taken off, slightly thicker sailing rope is usually more comfortable to work with. It twists less, and the knot remains easier to grip.
A fixed clasp with a loop or anchor works well when the size is clear from the start and the bracelet does not need to be adjusted constantly. For gifts or changing wearing preferences, an adjustable design is usually the safer choice. Anyone who wants to consider personalization can find good inspiration in bracelets with children's names for bringing size and meaning together.
Preparation without the usual workshop mistakes
When cutting, I prefer to leave extra length. A few extra centimeters cost nothing. Rope cut too short almost always ends in a compromise.
This is how I prepare the cord:
- Determine the length based on the design. Sliding knots need more material than a bracelet with a fixed clasp.
- Tape it before cutting. This keeps the sheath and core together.
- Seal the cut edge immediately. Heat it briefly, then shape it carefully. Do not let it turn black.
- Mark the center or align both sides. This is important if the knot or jewelry component is later meant to sit in the center.
- Hold the clasp in place temporarily. This is especially useful with anchors, end caps, or sliders, as it shows whether the thickness and opening really fit together.
Neat ends and the right amount of extra length often have more influence on the final fit than the knot itself.
A good example of a practical everyday design is the sailing rope disc bracelet with lucky symbol. It combines 4 mm sailing rope with a 13 mm disc made of 316L stainless steel, and the length is adjustable with knots. Designs like this work well because the material thickness, knot path, and wearing comfort are carefully coordinated.
The most important sailing rope bracelet knots explained step by step
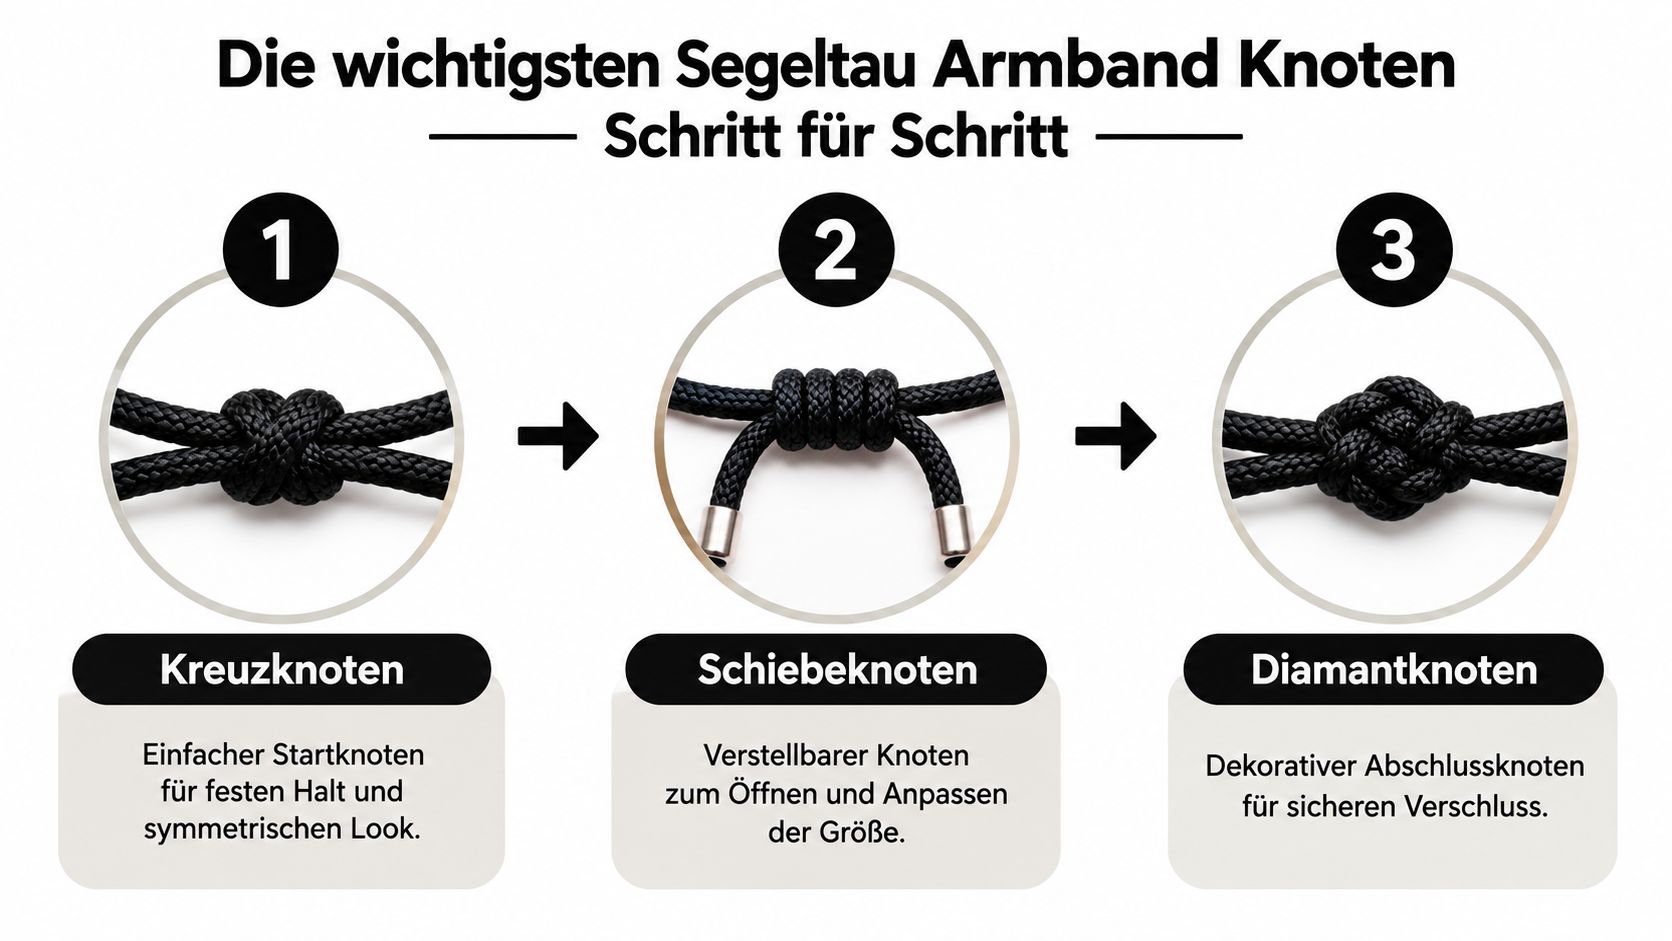
When the preparation is done properly, knotting becomes much easier. For most bracelets, you do not need a large collection of knots. Three solutions are enough for everyday use. Sliding knots for adjustment, figure-eight knots as stoppers, and finishing knots for neat ends.
The perspective from water sports is also useful here. For the German Sportbootführerschein See, 9 knots are relevant for the exam, including the figure-eight knot, reef knot, bowline, clove hitch, and others, as listed by ADAC in its overview of nautical knots and instructions for the Sportbootführerschein. This clearly shows that knots in Germany are not just decoration but genuine training knowledge.
For orientation, you can see the basic shapes at a glance here:
The sliding knot for adjustability
The sliding knot is the most important solution for bracelets that are meant to do without metal components. It is not under tension like a safety knot on a boat; instead, it should slide in a controlled manner and then grip again.
Proceed as follows:
- Lay the two cord ends parallel to each other.
- Take one loose end and pass it around the opposite cord.
- Make several neat wraps in one direction.
- Pass the end back through the resulting wrap.
- Tighten slowly until the knot sits compactly but can still slide.
- Repeat this on the other side if you are making a solution that can be adjusted on both sides.
Tension is important. If you pull it brutally tight immediately, the knot will lock. If you leave it too loose, it will not maintain its size later.
A good sliding knot does not jam. It moves with some resistance. That is exactly what makes it practical for everyday use.
The figure-eight knot as a stopper
The figure-eight knot is small, neat, and highly practical as an end stopper. I like using it on loose ends so the bracelet does not slip through when opened and the finish does not look like a craft project.
Here's how to tie it:
- Use the end of the cord to make a small loop.
- Take the end once around the standing part.
- Pass the end back through the first loop.
- Align the shape and tighten evenly.
The figure-eight knot rarely twists out of shape when it has been tied neatly. This is especially useful with smoother sailing rope.
Small securing knots for neat finishes
Not every bracelet needs conspicuous finishing knots. Often, a small securing knot directly behind an end piece, disc, or decorative element is enough. The point is less about show than keeping things tidy.
Pay attention to three things:
- Short distance from the component, so nothing rattles
- Both sides equal, so the bracelet looks centered
- Ends neatly trimmed and sealed, otherwise the knot will look untidy despite the effort.
The video shows the hand movements again:
When to use which knot
A single attractive knot does not make a good bracelet. The combination is what matters.
- Use a sliding knot when several people are trying on the bracelet or when it is put on and taken off every day.
- Figure-eight knots are ideal when the ends need to be restrained.
- Securing knots help create clean lines around pendants, discs, or transitions.
Once you set it up properly, you quickly realize that a good sailing-rope bracelet is technically more understated than spectacular.
Opening a sliding knot and adjusting the bracelet correctly
The best sliding knot is useless if the bracelet is adjusted incorrectly afterward. That is often exactly where things go wrong. Many people pull on one end, twisting the bracelet in the process, and then wonder why the knot sits crooked or gets stuck.
For measuring, German-language product descriptions often recommend allowing 1 to 2 cm of extra room around the wrist. At the same time, they point out that models with metal components or magnetic clasps are not resistant to seawater, as explained in sailing-rope bracelets with engraving and information on choosing the size and exposure to water. This combination is more important in everyday use than many people think.
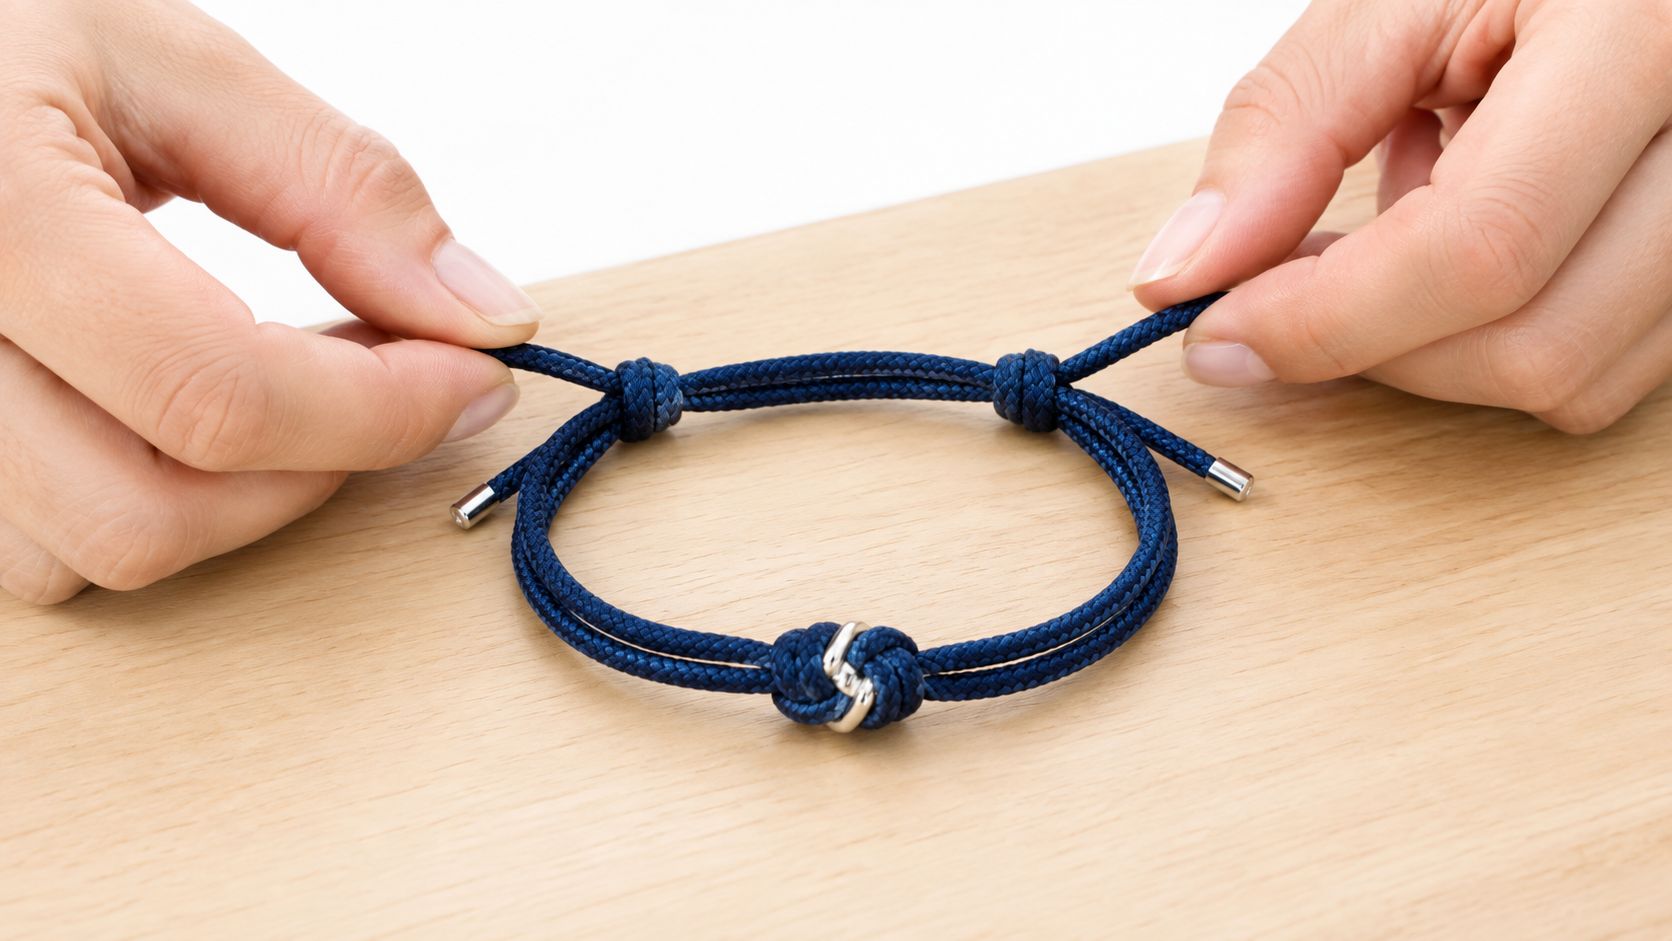
How to open the sliding knot without using force
Do not pull directly on the knot itself. That will only make it tighter. Instead, hold both sides in a controlled manner.
- To loosen, pull the two main loops apart.
- To tighten, pull the loose ends evenly.
- To readjust, slide the knot with gentle pressure, not with jerking movements.
If a knot snags, it is usually because of too much tension when tightening or because it was wrapped unevenly. Pulling will not help. It can only be loosened, aligned, and reset.
Which solution suits which wrist
Fixed knots and adjustable knots both have their place. You just need to know who the bracelet is intended for.
| Variant | Who it is suitable for | Everyday impression |
|---|---|---|
| Sliding knot | For changing fit, gifts, and everyday wear | flexible and uncomplicated |
| Tight knot with loop | For a clearly defined size | subtle look, but less forgiving |
| Metal or magnetic clasp | For people who do not like the band pulling | comfortable, but more sensitive to water |
When a bracelet just fits over the hand and is only tightened snugly at the wrist, it is usually the most comfortable.
When adjusting it, always make sure that the knots are the same distance from the left and right sides. Even small differences make the front view look uneven. And if an engraved plate or disc is meant to sit in the center, asymmetry is immediately noticeable.
Avoiding wear, care issues, and common mistakes
Monday morning, jacket half on, sleeve catches on the bracelet. It is precisely in moments like these that careful workmanship separates itself from attractive appearance. A sailing-rope bracelet holds up well in everyday use when the knots, clasp, and wrist are properly matched. The weak point is almost never the rope itself, but the knots, ends, and connection points.
Workshop experience shows that every knot costs the material some flexibility. Wraps that are tied too tightly move poorly, while those tied too loosely work themselves apart over time. This is more noticeable on slim wrists because the bracelet is guided more tightly and the sliding section is subjected to greater stress. Anyone who spends a lot of time around water, doing sports, or wearing jacket cuffs will generally do better with a simple, neatly fused sliding knot than with sensitive metal solutions.
Where bracelets really wear out in everyday use
Most damage does not come from one major jerk, but from many small stresses. Wet rope swells slightly, shrinks again as it dries, and pulls on the knots in the process. Then there are sunscreen, sweat, sand, and rough table edges. If the ends are only half-sealed, the fibers fray and slow down every adjustment.
These are the mistakes I see most often:
- Band ends that are too short. The adjustable section then remains under constant tension and the knot tightens itself.
- Overly hard fusion at the tips. The end holds, but becomes stiff and chafes inside the knot channel.
- Misaligned knot positions. The bracelet looks off-center and feels less settled on one side.
- The wrong clasp for everyday use. Magnetic clasps are convenient, but more sensitive to water, impacts, and fine dirt.
- A knot that is too thick for a slim wrist. It looks good on the table, but presses against the wrist while working or typing.
Which solution stays reliable and neat for longer in everyday use
| Solution | Suitable for which everyday use | Typical strength | Typical weakness |
|---|---|---|---|
| Sliding knot made from sailing rope | everyday use, changing fit, gifts | flexible and easy to readjust | runs poorly when wrapped too tightly |
| Figure-eight knot as an end stop | fixed length, defined ends | clean finish, little hardware | no adjustment |
| Magnetic clasp | comfortable to put on, little pull on the cord | quick to put on and take off | more vulnerable when wet and used roughly |
| Fixed loop with matching counterpart | familiar size, understated look | stable and simple | forgives sizing errors poorly |
Care is easy when you do it in time. Lukewarm water is usually enough. Then simply pat it dry and leave it to dry flat. No radiator, no hair dryer, and no strong pulling while wet. After drying, I briefly shape the knots between my thumb and fingers. This keeps the sliding action smooth and prevents hard kinks from forming.
Anyone who alternates between several pieces of jewelry knows the problem from chains and clasps too. With an everyday men's necklace with pendant, you can clearly see how strongly the choice of material and wearing habits determine durability.
A well-made nautical rope bracelet may show signs of everyday wear. It just shouldn't lose its shape, snag, or become annoying on the wrist. That's how you can tell whether the knots and clasp not only look good but also suit the wearer's lifestyle.
Your perfectly fitting nautical rope bracelet for every day
You don't recognize a good nautical rope bracelet first by its knot pattern, but by how naturally it can be worn. It slides easily over the hand, then sits comfortably on the wrist and doesn't get annoying with every movement. That's why the best solution is often not the most eye-catching knot, but the one that fits best.
For everyday wear, a neatly made sliding knot is usually the most sensible choice. If you need defined end points, you can add a small figure-eight knot. If you're planning a gift or don't know exactly how the bracelet will be worn later, adjustability is almost always the safer choice.
Stylistically, nautical rope works best when used sparingly. According to a trend overview for men's bracelets, the market in 2025/2026 remains shaped primarily by leather, stainless steel, and mixed materials, while nautical rope tends to work as a niche through maritime design, craftsmanship, and personalization, as discussed in Accio's overview of trends in men's bracelets for 2025 and 2026. That is precisely its strength. It doesn't have to be loud to have character.
If you're thinking about couples' jewelry or a coordinated gift, you'll find another approach in Couple bracelet ideas, where meaning and comfort come together.
If you're looking for a nautical rope bracelet that not only looks good but can also be sensibly adjusted with knots, OTANTO offers handmade, customizable jewelry from Germany. Especially with nautical rope bracelets, the combination of an adjustable design, clean workmanship, and personal engraving is often exactly what works in everyday life.


